The Tygron Community Forum will be discontinued on March 6th 2026, matching the release of the 2026 version of the Tygron Platform.
Click on your picture in the top right corner, go to Preferences and select your notification preferences.
Please keep in mind:
1. To only comment on the topic where the discussion is about. Do you have a new question or topic? Please start a new discussion.
2. Be kind to other users!
A simple method for adjusting landscape features using free GIS software
Hi there!
Are you looking for an easy way to change the properties of an area (type) in your project? Here I present a simple but effective method, which makes use of the free QGIS software (available at https://www.qgis.org/en/site/) and requires no prior experience.
In this example we will try to adjust the depth of a channel, without changing anything for the surrounding water areas on the map.
Tygron Platform:
1. Have your project ready in front of you.
2. In the Editor go to 'Current Situation'.
3. Select 'Terrain' in the top menu.
4. From the drop-down choose 'Export GeoJSON File'.
5. Filter on 'Water' and click 'Export'.
QGIS:
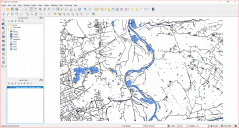
6. Drag the newly exported file into QGIS.
7. In the top menu click 'Toggle Editing'.
8. Also click 'Select features by area or single click'.
9. Select all areas you wish to exclude from the adjustment (everything not part of the channel).
10. Once your selection is complete click 'Delete Selected'.
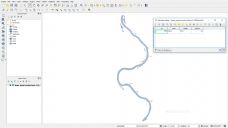
11. To get rid of the boundaries between polygons, select them all at once.
12. Now go to Edit and click 'Merge Selected Features'.
13. Click 'Open Attribute Table'.
14. Adjust or add attributes to your liking. Now let's add the attribute 'Depth' and give it a value.
15. Close the attribute table.
16. Again click 'Toggle Editing'.
17. Right-click the adjusted layer in the bottom left panel.
18. Choose 'Save As...'.
19. Select GeoJSON from the Format list.
20. Browse to your destination folder and click 'Save'.
Tygron Platform:
21. Again go to 'Terrain' but now click 'Import Geo Data'.
22. Click 'Next' > 'Select File' and select the newly adjusted file.
23. Click 'Next' two more times.
24. Choose 'Water' from the Default Terrain Type list.
25. Click 'Next' and choose to Override Water Bottom Height.
26. Select the newly added 'Depth' attribute.
27. Click 'Next' and 'Finish'.
28. Use the Measuring Tool to verify the new depth of the channel.
Well done! You have now successfully adjusted the depth of your channel independently of the surrounding water areas in your project.
Of course there are more ways to achieve suchlike objectives. Do you know another easier or maybe more efficient method? We encourage you to share it with us on this forum.
Cheers!
Jorn


Comments
Hi Jorn, I would like to do something similar but instead to change the heat effect of the water (from -10 to -4.5). When I import the terrain type as described and select water as the default terrain, I am given no option to add the new 'heat effect' attibute, or any attribute for that matter. It simply goes to the 'finish' button.
I am using the LTS, is this process you have used in the preview version?
Thanks!
Hi Ellie,
You can simply do this by navigating to the terrain type 'water' and changing its value for the HEAT_EFFECT attribute accordingly. In contrast to parameters such as the bottom elevation and angle of repose, it is currently not yet possible to change this value for only a selection of the water terrains present in your project.
Hope this answers your question.